Friday 30 October 2015

My Halloween Make-up


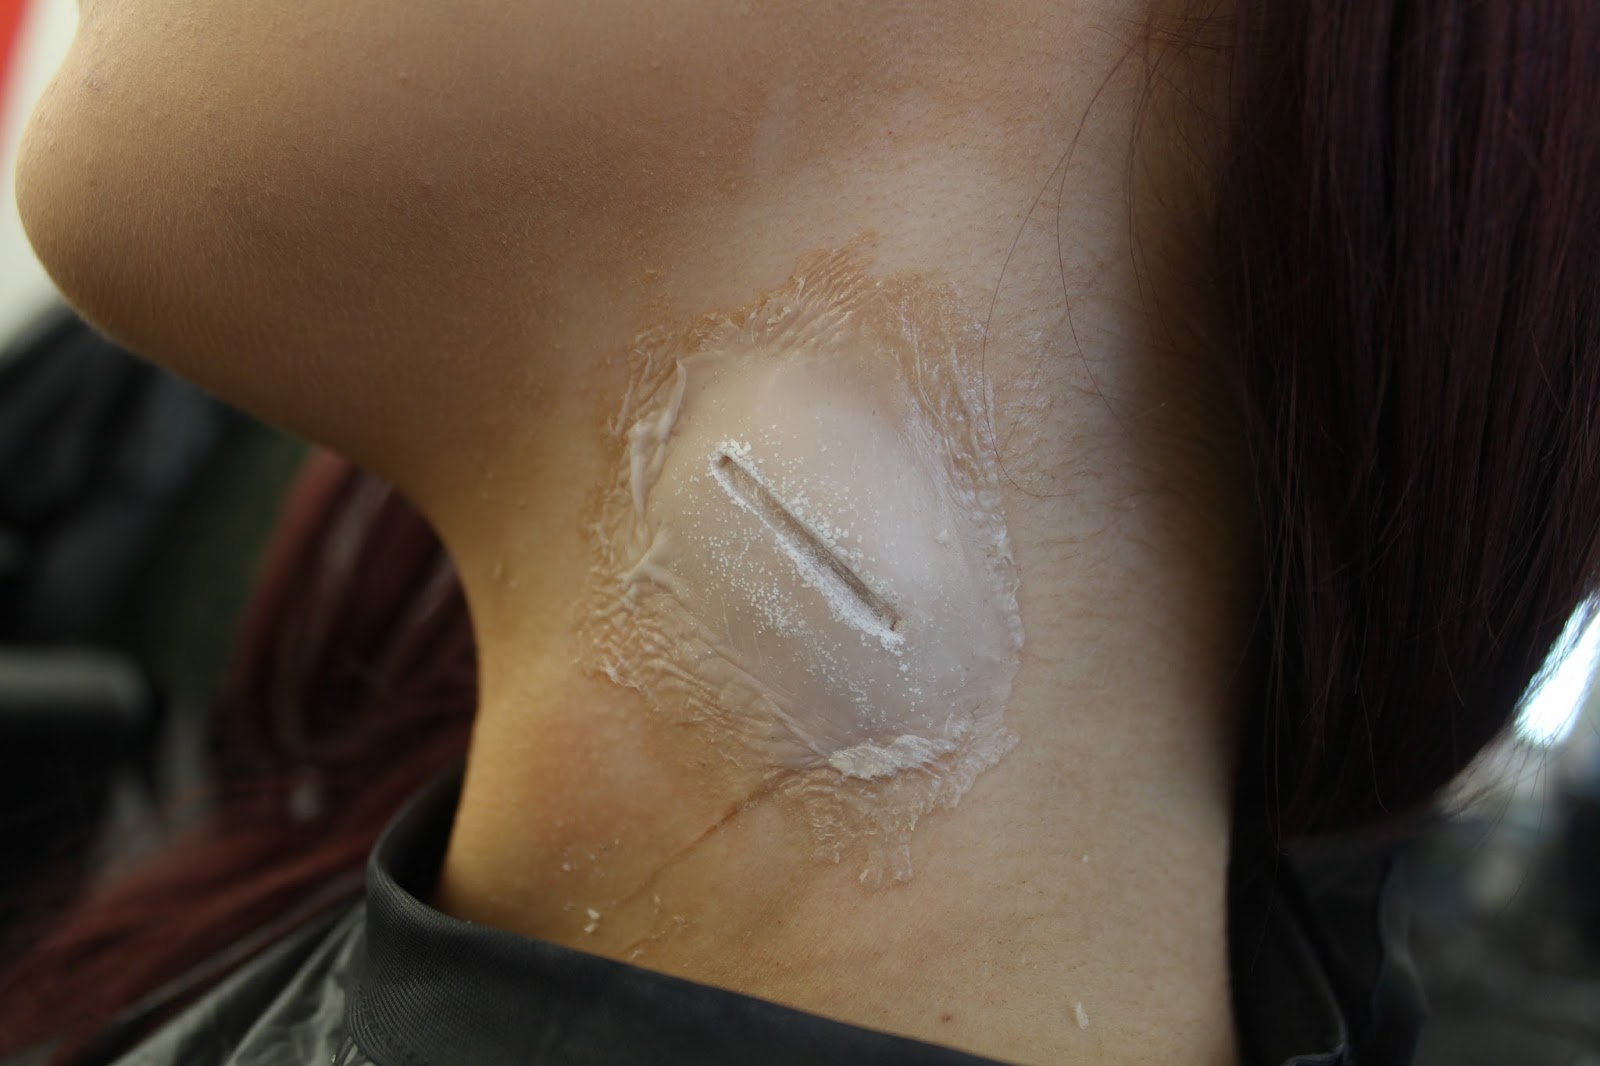
I created the wounds by applying Cinewax to the skin and blending the edges, I then used a sharp edge to create a cut/gash in the centre. I coloured the cinewax with foundation (that matched my face) and supracolor to add slight bruising/redness. Finally, I applied wound filler into the cut, and dripped blood over it, and on other parts of the face/body. 

I accompanied these wounds with a very dark black and red smokey eye and ombre lip. To finish off the look I added white contact lenses, and also had to put them in for someone else! Although this did take a while, me and my model kept communicating, and eventually we managed to get them in! They definitely complete the look. 

I thought that this was relevant to post on my blog because it shows a different way in which you can create wounds without creating a mould and casting. Although it is easier and quicker to do, I would say that the results are not as authentic and obviously you can not recreate or reuse the Cinewax wounds. 


Wednesday 28 October 2015

Technical Folder - How To Apply A Bald Cap

Helpful Tips:

  • Do not apply moisturiser prior to bald cap application
  • Do not use any pins/grips in the hair
  • You are aiming to create the smoothest/roundest possible
  • Some bald caps will be specifically made to fit a model's head
  • Any straight edges can be seen on camera much easier than curved/wobbly ones
  • They cannot go on anyone that has a weave
The Application:
  1. Remove any make-up from the model, ensuring the edges of the head are clean
  2. Spray the hair with water and brush through
  3. Put a strong hair gel through all of the hair
  4. Keep brushing to ensure that it is as smooth as possible
  5. (If short-ish hair) wrap all of the hair to one side and scrape as flat to the skull as possible
  6. (If longer hair) split the hair into 2 and wrap the hair round the opposite sides of the head, keeping it as flat to the skull as possible
  7.  Get the model to hold the front of the cap, whilst you carefully pull it over the rest of the head
  8. Check that all the hair is pushed back (using a pintail comb), and use soap to get rid of any baby hairs on the face
  9. Cut the bald cap very carefully to fit the model, starting at the ears
  10. Get the model to stretch forward when cutting around the back of the neck
  11. Peel back the front of the cap and apply spirit gum to both the cap, and the model's forehead 
  12. Wait for it to go tacky before sticking it back down
  13. Use a damp puff/towel, press the cap down onto the model's skin
  14. Use acetone to help melt the edges away

  15. You can now begin to colour. Using the supra colours, mix white and red to create a baby pink. Using a sponge, dab this across the whole head. This will cancel out the hair colour underneath the cap.
  16. Using the ultra foundation palette, use a sponge once again and dab all over the head.
  17. Apply translucent powder to the head
  18. Add any additional touches, such as flicking the alcohol palette colours onto the head to create freckles, or making veins using the supracolor palette

Saturday 24 October 2015

Human Hybrid Initial Research

Hybrid: the offspring of two animals or plants of different breeds, varieties,species, or genera, especially as produced through humanmanipulation for specific genetic characteristics.

Human-Nature hybrids

Human-Animal hybrids

I felt that the best way to gain initial knowledge and ideas/inspiration is to look at visuals, as to me, this sums up hybrids better than words can. Initially, I am more drawn to the idea of the human-nature hybrid because I feel that the outcome can be slightly more experimental and less 'obvious', but I will continue researching. 

At this present moment, I feel slightly overwhelmed by this project and the brief because it seems like it will require a lot of preparation, and extremely good technical skills... I hope that we are taught the required skills to be able to create an outcome that is of a high standard, because I think it could be a lot of fun and allow me to be very creative and innovative. 


SFX Make-up In TV/Film & Its History


HISTORY
  • The first archaeological evidence of cosmetic usage is found in Ancient Egypt around 4000 BC
  • The Ancient Greeks and Roman also used cosmetic containing mercury and often lead.
  • In the western world, cosmetics were used throughout the medieval period, although their use was typically restricted to the upper classes.

  • The using of special effect was in 1895 in the film "Demolotion d'un Mur" in Paris and this is actually the first experiment on trick photography.
  • In 1902, "A Trip to the Moon" and "Adventurous Automobile Trip" also using special effect makeup.
  • In 50's, Sci-fi and Horror genre became famous and in 90's CGI began to used in film such as Terminator, and Jurassic Park sequel.

  • The early black and white movies didn't show colors and by that special effects makeup had limitations.
  • Actors had to find their ways to help makeup bring their character alive, so that the acting is believable
  • With time and new technology, makeup effects see no more boundaries.
  • As an example:

SELF SERVICE
  • Actors, in the days before the "Talkies", often put on their makeup on.
  • Because of they short main power, actors tend to put their makeup by themselves.
  • Its easier and they don't spent much time by waiting and just to be on the character.

LON CHANEY SR.
  • He was a trailblazer in using simple yet innovative ideas such as wigs and fish skins to change his looks.
  • He also Named "The Man of a Thousand Faces" and we can see he features in silent movies.
  • His specialty in makeup is "Extraordinary Characterization".
"i wanted to remind people that lowest types of humanity may have within them the capacity for supreme self-sacrifice," Chaney wrote in Moviemagazine.
  • This mean that he teach us to use any usable material in making the pieces. As an example, news paper, we can reuse it to make a new character.
 
* Lon Chaney Sr. in Phantom of the Opera and Himself


MAX FACTOR
  • This product create makeup specifically designed for films.
  • This giant step allowed for further development in special effects.
  • From the basic step, this product change and evolve the using of makeup to another stage by developing the using of makeup.

FRANKENSTEIN
  • The fictional Frankenstein monster's body was create piece by piece in a laboratory.
  • His head was fashioned of Collodion-Soaked Cheese Cloths and Grease Paint.
  • This is one of the well known movie all time by creating a monster using special effect makeup.
  • The making took many hour just to create one piece of the body such as couple of ears, nose, mouth etc.

*Boris Karloff as The Frankenstein Monster


PROSTHETIC
  • "The Wizard of Ozwas the big movie to use prosthetic.
  • Actors had a part glued on to them in the morning before the camera roll.
  • Its shows that many time needed for them to prepare for the scene.
  • The basic process is prosthetic sculpting, molding to create advance cosmetic effects.


LEADER:
  • Rick Baker : An American Werewolf in London, The Nutty Professor, Planet of the Apes, How the Ginch Stole Christmas.
 
  • Tom Savini : Friday The 13th, Dawn of the Dead, Creepshow.
  • Rob Bottin : The Howling, The Thing, Robocop, Total Recall.
  • Ben Nye : The Fly
  • William J.Tuttle : 7 Faces of Dr.Lao

Book Reference:
Special Effects Make-up By Janus Vinther, Psychology Press, 2003

Web Reference:
http://jaimieslookbook.blogspot.co.uk/2011/01/chapter-1-history-of-special-effect_15.html

The Aftermath

The club owners immediately rang an ambulance...
In the mean time, they were told:

  • Don't try to remove the object. Doing so could cause further harm.
  • If needed, control bleeding by pressing firmly around the object to bring the edges of the wound together and by raising the injury higher than the heart.
  • Bandage the wound. First put a piece of gauze over the object. Then, if it helps, put clean padding around the object before binding the wound securely with a bandage or a piece of clean cloth. Take care not to press too hard on the object.

She then went to hospital where the damage would be assessed by one of these methods...

Epidemiology

The prevalence of glass foreign bodies in wounds from injury has been recorded in 1.5% in superficial (subcutaneous) wounds and 7.5% of deeper wounds  

Radiographic appearance

Plain film
Only ~10% of x-rays ordered for investigation of retained foreign bodies are positive (reflecting the low incidence post injury) but x-rays are excellent at detecting radiopaque foreign bodies with ~85% being detected
  • glass is always radiopaque, independent of lead content or other additives
  • should be visible on plain films if larger than 2mm 2, 5
Ultrasound
  • can be used to further localise foreign bodies and define relationship with soft tissue structures and assess for further injuries
  • appears hyperechoic with posterior shadowing and often demonstrates reverberation artifact
  • if present for >24 hours may demonstrated a hypoechoic ring 3-4
They were able to remove the glass, and no serious damage was caused, but she will be left with a small scar that may eventually fade...

Web reference:
http://www.mayoclinic.org/first-aid/first-aid/basics/art-20056604
http://radiopaedia.org/articles/glass-foreign-bodies
http://www.london24.com/polopoly_fs/1.3203045!/image/2392105568.jpg_gen/derivatives/landscape_490/2392105568.jpg

Medical Records


RCP Approved ‘Generic Medical Record Keeping
Standards’
Prepared by the Health Informatics Unit of the Royal College of Physicians
Generic medical record keeping standards define good practice for medical records and address the broad requirements that apply to all clinical note keeping. These standards were developed by the Health Informatics Unit of the Royal College of Physicians following review of published standards and wide consultation. They were first published in 2007 in Clinical Medicine.

Standard Description
  1. The patient’s complete medical record should be available at all times during their stay in hospital
  2. Every page in the medical record should include the patient’s name, identification number (NHS number)1 and location in the hospital
  3. The contents of the medical record should have a standardised structure and layout 
  4. Documentation within the medical record should reflect the continuum of patient care and should be viewable in chronological order
  5. Data recorded or communicated on admission, handover and discharge should be recorded using a standardised proforma2
  6. Every entry in the medical record should be dated, timed (24 hour clock), legible and signed by the person making the entry. The name and designation of the person making the entry should be legibly printed against their signature. Deletions and alterations should be countersigned, dated and timed
  7. Entries to the medical record should be made as soon as possible after the event to be documented (e.g. change in clinical state, ward round, investigation) and before the relevant staff member goes off duty. If there is a delay, the time of the event and the delay should be recorded
  8. Every entry in medical record should identify the most senior healthcare professional present (who is responsible for decision making) at the time the entry is made
  9. On each occasion the consultant responsible for the patient’s care changes, the name of the new responsible consultant and the date and time of the agreed transfer of care, should be recorded
  10. An entry should be made in the medical record whenever a patient is seen by a doctor. When there is no entry in the hospital record for more than four (4) days for acute medical care or seven (7) days for long-stay continuing care, the next entry should explain why3
  11. The discharge record/discharge summary should be commenced at the time a patient is admitted to hospital
  12. Advanced Decisions to Refuse Treatment, Consent, Cardio-Pulmonary Resuscitation decisions must be clearly recorded in the medical record. In circumstances where the patient is not the decision maker, that person should be identified e.g. Lasting Power of Attorney

Web reference: 
https://www.rcplondon.ac.uk/sites/default/files/generic-medical-record-keeping-standards-2009.pdf
http://helpers.shl.lon.ac.uk/examples/lshtm.gif

The Final Images And Evaluation


Overall, I was fairly happy with my character and wound, but I do feel that it could've been better. I feel that from a distance the wound looks good, and it is fairly obvious that the wound is very recent, because there is not an extensive amount of blood, and the glass is clearly still in the wound (which I think definitely makes the wound). 

However, on close-up pictures, the actual wound and the area around the glass is too smooth - there needed to be more texture and fine lines/wrinkles. Also, the edges needed to be more seamless and blended out smoother. The contrast between the wrinkles in the neck/boldiez, and smoothness of the wound is too harsh, and makes it stand out and appear almost slightly rubbery.

I am happy with the characters make-up, although you can barely see the tears/marks it had left, so if I had more time then I definitely would have made this more obvious, and perhaps even smudged the make-up slightly, but I did not want this to be too obvious, because the model is still just in shock at this point, and the adrenaline is kicking in, meaning she does not feel the pain very much. I am happy with the colour match of the wound, and the amount/placement of blood - I feel that this is quite realistic and is not too overdramatic and theatrical. 

So overall, I am fairly happy with it for a first attempt, and it has taught me a lot of important and relevant information already. I have enjoyed creating these wounds and moulds, and creating my character, but I would now definitely feel much more confident if I were to do it again, knowing all of the information that I know now, and I feel that I would produce a stronger outcome. 

Creating The Character - The Wound


  • Coat both, the back of the wound, and the model's skin area that you are applying the wound to in pros-aide
  • Wait for this to go clear (on both) before applying it
  • When they have both gone clear, apply the wound to the skin as smoothly as possible 
  • Using cotton buds, apply alcohol to the edges of the wound and try to blend it out as smoothly as possible
I found this difficult for a number of reasons... When applying the pros-aide the wound tends to fold over on itself and stick to itself, which is then quite difficult to flatten out again. I also found applying it to the skin quite difficult, because it was hard to apply it smoothly, and as a result my piece was quite wrinkled on the skin. Furthermore, where the model was turning her head and moving her neck (which is very natural, and I did not expect her to sit uncomfortably for a long period of time!), it created even more wrinkles. 


This is my piece before the paint job, the wound was no where near as smooth as I would have liked it to be, but I think this is down the placement of the wound, as well as my technical abilities. I feel that is it was on a smoother, slightly easier and more comfortable area (e.g. the arm/leg) it may have turned out slightly better. 

As you can see, my model decided to wear fake tan on the day (which I was not aware that she would be doing), which meant that the skin colour was not a good of a match as it should have been, and the alcohol actually took the fake tan off of the area around the neck, which meant it would be more difficult for me to colour match the whole area. 
  • I applied foundation around the patchy area of the wound to try and even it out again
  • I then used the alcohol-activated palette, and a paintbrush to splatter different tones of colour on the area and to try and create a close match 


I was quite happy with the colour that I created, and felt that I hid the patchiness as best I could. 

  • I then applied spirit gum onto the edge of the piece of the glass that I was using, and into the gash in the wound
  • I left this until it went tacky (so that it would allow it to stick and stay in place). Meanwhile, I figured out which way round the glass should be inserted, so that it fitted snuggly into the mould
  • I then gently pushed the glass into the wound, keeping constant contact with my model, ensuring that it was not anywhere near touching her skin
  • I then began applying fake blood around the edges, and forcing it to drip down
  • I then used a paintbrush to flick more blood, so that it was not so 'clean', as realistically it would not have been
  • I also used my finger to smudge some of the blood slightly, where my character would have panicked and gone to touch it 


Creating The Character - Facial Make-up

I followed the step by step guide (as shown in previous post) to create the make-up. The reason I did the make-up first is because the wound is not be on the face, thus does not intercept the make-up, and also my model was waiting for her wound to set, therefore this was time efficient for us both. 


I was very happy with how the make-up turned out; everything went to plan here, and it definitely looked like she dressed up and ready for a night out. I did the make-up quite heavily so that it shows up well on camera. 

Just before I take the pictures, I am going to drip some water down the face to show a couple of tears, but it is so soon after the event that the character is in shock and the pain has not actually hit her yet. Also, she is wearing double-wear foundation, which is water resistant, so the make-up will not really move very much, unless she was substantially crying (which she is not yet!). 

Tchnical Folder - Removing The Wound From The Mould

To remove the wound from the mould, you must be extremely careful as the piece is very delicate and can rip very easily...
  1. You must smother the piece in powder (e.g. baby powder, Illamasqua translucent powder, etc)
  2. You should then use a paint brush and carefully push it into the edges of the mould so that the boldiez starts to become loose and detach from the mould
  3. You should keep applying the powder and working the piece away from the mould 
I actually found this one of the hardest parts of the whole process! I did not quite realise how delicate the piece was, and underestimated how hard it would be to remove the wound. As you can see, as a result, some of my boldiez was missing at the edge and this meant that one "corner" of my wound was very close to the edge. 

After discussing with Kat, we decided that this would still be OK to work with. I then slightly trimmed around the edge (as I did not need all of that boldiez), leaving at least 1 cm of boldiez around the wound. However, I felt that the actual wound itself had worked well, e.g. the glass indentation was deep and snug enough for it to sit in place (with some help of something tacky), but it was not the whole way through so that the glass would be touching the model's skin. 


Step-by-step Character Make-up

Tools/equipment needed:
  • Estee Lauder double-wear foundation
  • Concealer (slightly lighter than foundation)
  • Illamasqua translucent powder
  • Eyeshadow (in eye brow colour)
  • Illamasqua sealing gel
  • Illamasqua sculpting duo 
  • Illamasqua bronzing duo
  • Illamasqua blusher duo
  • Smashbox full exposure palette
  • Mascara & disposable wands
  • Eyeliner
  • False eyelashes
  • Lipstick
  • Foundation brush
  • Angled brush
  • Eyebrow brush
  • Powder brush
  • Blusher brush
  • Eyeshadow brushes
  1. Apply Estee Lauder double-wear foundation all over the face
  2. Apply a slightly lighter concealer under the eye area
  3. Set this with translucent powder
  4. Heavily fill in, shape and define the eyebrows using suitable eyeshadow and sealing gel
  5. Using an angled brush, contour the cheek bones, forehead and the nose
  6. Add bronzer to the cheeks and edges of the forehead
  7. Add blusher to the apples of the cheeks, blending it back into the bronzer
  8. Apply highlighter to the tops of the cheekbones and down the middle of the nose 
  9. Create a smokey eye in the crease of the eye (using Smashbox full exposure palette)
  10. Add eyeliner to the top lid
  11. Apply mascara to both the top and bottom lashes
  12. Apply false eyelashes to the top set of lashes
  13. Finally, apply lipstick to the lips


Sunday 18 October 2015

Face/Hair Chart For My Character

This is my face/hair chart for my character - as you can see my model has a purple tone to her hair which is why I have chosen a purpley-coloured lipstick. Also, dark coloured lips are very on-trend at the minute, which is what I want as my character is modern and present. The rest of her make-up is quite heavy, e.g. the contouring, false eyelashes, eyebrows, and neutral coloured eyeshadow in the crease. The hair will have a side-parting and will be straight. 

I am then going to make the make-up run slightly (by running some water down the face) to show the fact that she is/has been crying due to the amount of pain of having a glass shard in you. 

Friday 16 October 2015

Technical Folder - Creating My Mould


Equipment/tools needed:
  • Sticks
  • Gloves
  • Glue gun
  • Clay sculpture on some plastic
  • Measuring cups
  • Scissors
  • Fixing spray
  • Petrolease
  • Silicone A
  • Silicone B
  • Scales
  • Cling film
  • Baby wipes
  • Tissues
  • Isopropyl alcohol
  • Baldiez
  • Hair dryer
  • Brush
  • Deadener
  • Silicone pigments
  • Metal plate
  • Naphtha
  • Baby buds

Preparation:

  • Label 2 separate sticks A and B
  • Apply cling film over working surface and scales
  • Apply gloves
  • Turn the glue gun on so that it can heat up
  • Clay sculpture should be ready for moulding

Step by step:
1. Cut the top of the cup off, about 1/3 of the way down.


2. Shake the fixing spray well, go over to an open window, and spray the clay evenly from about 20cm away.
3. Once the fixing spray has dried, spray the clay evenly with some Petrolease, from about 20cm away, again.
4. Place the cup around the wound and use the glue gun to secure the cup to the plastic so ensure no silicone will leak out. Press down on the cup whilst the glue is drying so that it lies flat. Leave the glue to dry and harden.
5. Put a new cup on the scales and put the scales to 0.
6. Put on some new gloves and take a stick labelled A and scoop out some of the silicone A and put it in the cup until it reaches 30 grams.
7. After the 30 grams has been added to the cup, clean the outside of the pot with silicone A in it with baby wipes and put the lid tightly on.
8. Put some new gloves on and use a stick labelled B with the silicone B and scoop 30 grams of product into the cut with A in it.
9. Clean the outside of the pot of B with some baby wipes and secure the lid.
10. With the same B stick mix the products together well and try to get as little bubbles as possible. If bubbles occur, then tap the cup on the table and they should rise to the surface and disappear.
11. Pour the silicone mixture over your wound so that the silicone completely covers the wound. Do this in back and forth motions to give an even coverage.
12. Let the silicone set for about an hour or until it hardens

13. Once the mould has set, cut around the glue and pull out the hardened silicone.
14. Wipe the silicone with a cotton pad and isopropyl alcohol.


(Creating the wound using the mould)
15. Spray the mould with Petrolease evenly, from a 20cm distance and let it dry.
16. Create a mixture of 1 part baldiez and 2 part isopropyl alcohol and mix together well.
17. Pour some of this mixture into the dents in your silicone and smooth it away with a brush to blend the edges and coat the wound.
18. Apply a second coat all over the wound and let it dry, You can use a cool hair dryer to speed up this process.
19. Apply some gloves and add 8 grams of silicone A into a clean cup with a stick labelled A.
20. Wipe the pot down with a baby wipe before securely tightening the lid.
21. Apply some new gloves and add 8 grams of silicone B with a stick labelled B.
22. Wipe the pot down with a baby wipe before securely tightening the lid.
23. Using a new stick and some new gloves, add 12 grams of deadener to the mixture to make the silicone softer and more skin-like.
24. Add 1 - 2 drops of pigment to your mixture to make it close to your model's skin colour.
25. Pour the mixture into the mould.
26. Using something flat, e.g.metal plate from kit, run it across your wound to get rid of any excess mixture and make the product flat with the mould.
27. Put some Naphtha on a baby bud, wipe off the excess, and blend out the edges so that they won't look so harsh on the skin.
28. Leave to set for at least an hour
29. Powder so that it does not stick to anything
I really enjoyed doing this lesson because I actually quite like the more technical side of things, e.g. maths/following precise instructions, because I've always been quite good at it, and hence why I finished in plenty of time and was able to help others out. 

I had not used any of these products before, and had never made anything like this, so I liked the fact that I got to learn something completely new and that it will be very useful in the future. I think I did quite well in creating the mould because everything went to plan and turned out how it was supposed to, so hopefully the same goes for my wound! For example, I hope my glass shard fits nice and snug into the mould, etc. I realise that I probably won't be able to reuse this mould because it is extremely precise and will only work with my glass shard that I am using, but I am glad that I have been shown how to make these moulds so that I can make more that I can actually reuse and have popular designs/wounds. 

We have not yet been shown how to take the wound out of the mould, so I am waiting for next weeks lesson in order to be shown how to do that. I am slightly nervous that it will not work how I want it to, but there is no way for me to know yet. I hope I am able to colour the wound realistically (e.g. with blood) and that it turns out the way I am hoping; however I have not been able to practice, since we do not have the mould. I am excited for next week where we get to finish the wound and create the whole character.